Intro
I’ve decided it’s about time to finish my Domoticz setup and connect all my devices to it. I just did it and this post is about the setup.
I currently have several sensor boards with ESP8266 that I made for measuring mostly the temperature and also several ESPurna– based Sonoff switches ( controlling boilers, water pumps, and heating ), which I wanted to connect in one app and have an overview, control from mobile, etc.
I have an all-time running server at home, which I decided to use for that purpose. You can, of course, use any connected machine (or virtual server) you like. However, if you need to connect Z-Wave USB adapters, real hardware is needed. You can go with Raspberry PI too (that was my initial setup), however, I found that it’s a bit cumbersome to set up and support. Docker setup is much easier.
Docker
Okay, so I’m assuming you have a running Docker on Linux. If you don’t, please install it ( there are numerous tutorials on that ) and continue.
Traefik
Okay, that’s not mandatory at all, but I’ve used
My configuration for running Traefik ( in Docker, of course) is like this:
docker run --name=traefik --restart=unless-stopped -d -p 80:80 \
    -p 8081:8080 \
    -p 443:443 \
    -l traefik.enable=true -l traefik.backend=traefik \
    -l traefik.frontend.rule=Host:traefik.example.net \
    -l traefik.port=8080 \
    -v /opt/traefik/traefik.toml:/traefik.toml \
    -v /opt/traefik/acme.json:/acme.json \
    -v /var/run/docker.sock:/var/run/docker.sock \
    traefik
traefik.toml looks like this:
debug = false

defaultEntryPoints = ["https","http"]

[entryPoints]
    [entryPoints.http]
    address = ":80"
    [entryPoints.http.redirect]
    entryPoint = "https"
    [entryPoints.https]
    address = ":443"
    [entryPoints.https.tls]

[retry]

[docker]
    endpoint = "unix:///var/run/docker.sock"
    domain = "traefik.example.net"
    watch = true
    exposedbydefault = false

[acme]
    email = "youremail@example.net"
    storage = "acme.json"
    entryPoint = "https"
    OnHostRule = true
    [acme.httpChallenge]
    entryPoint = "http"

[web]
    [web.auth.basic]
    users = ["admin:ENCODEDPASSHERE"]

address = ":8080"
Of course, you have to replace example.net entries with your domain and if you want to protect it with a password (I strongly
Domoticz
I’ve used Linuxserver’s Domoticz image. The script for starting is:
docker run -d --name=domoticz \
    --net=bridge \
    --restart=unless-stopped \
    -v /opt/domoticz:/config \
    -e PGID=1001 -e PUID=1000 \
    -e TZ=Europe/Sofia \
    -p 21443:1443 \
    -p 26144:6144 \
    -p 28080:8080 \
    --device=/dev/ttyACM0 \
    -l traefik.enable=true -l traefik.backend=domoticz \
    -l traefik.frontend.rule=Host:domoticz.example.net \
    -l traefik.port=8080 \
    linuxserver/domoticz

docker exec domoticz apk update
docker exec domoticz apk add mosquitto-clients
The –device=/dev/ttyACM0 row is optional and is used with USB Z-Wave dongle I have, so that Domoticz can see it. Omit, if you will never use it.
The last two commands I use to add MQTT clients package, which I use in LUA scripting (further below). Also, by using Traefik labels, I’m making sure that Domoticz is visible on https://domoticz.example.net (or whatever your domain is).
MQTT
First, prepare two files ( my location is in /opt/mqtt/config , but yours might differ).
mosquitto.conf with this content:
password_file /mqtt/config/passwd
allow_anonymous false
and passwd file can be created like this (make sure you have mosquitto package (on Ubuntu it’s installed like sudo apt install mosquitto) :
mosquitto_passwd -c /opt/mqtt/config/passwd domoticzInstall MQTT in Docker with the following command:
docker run --name mqtt -d --restart=unless-stopped \
  -p 1884:1884 \
  -v /opt/mqtt/config:/mqtt/config:ro \
  -v /opt/mqtt/log:/mqtt/log \
  -v /opt/mqtt/data/:/mqtt/data/ \
  toke/mosquitto
MQTT in Domoticz setup
In Domoticz web interface, go to Settings -> Hardware and add new device of type MQTT Client Gateway with LAN interface:
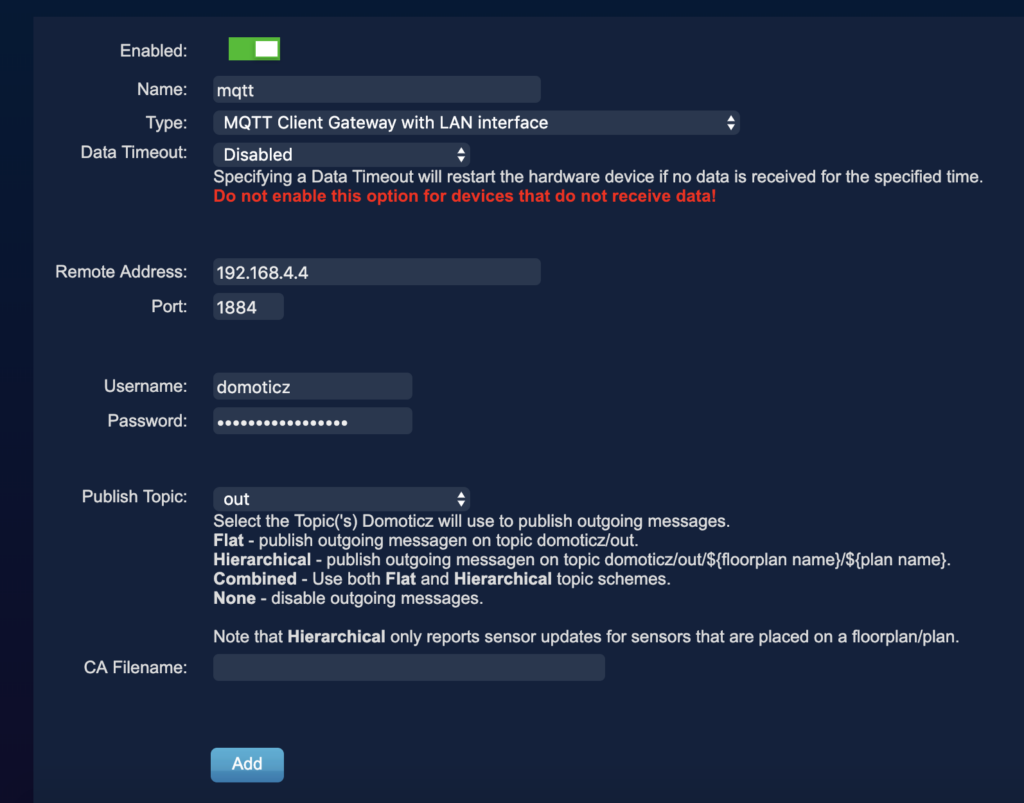
Of course, enter the IP address of your machine and the username + password you’ve used.
OpenSenseMap
For adding public OSM sensors in Domoticz, I’ve chosen to use lua scripting.
In /opt/domoticz/scripts/
function timestampToTime(ts)

    local pattern = "(%d+)-(%d+)-(%d+)T(%d+):(%d+):(%d+).(%d+)Z"
    local runyear, runmonth, runday, runhour, runminute, runseconds, runmillisec = ts:match(pattern)

    local d = os.time({year = runyear, month = runmonth, day = runday, hour = runhour, min = runminute, sec = runseconds})
    return d
end

function timeGMT()
    local dt = os.date('!*t')

    if os.date("*t").isdst then
	return os.time(dt) - 3600
    else
	return os.time(dt)
    end
end

function reqUpdate(idx)
    os.execute("(sleep 2 && mosquitto_pub -h mqtt.example.net -p 1884 -t 'domoticz/in' -u domoticz -P MYPASSWORD -m '{\"command\": \"getdeviceinfo\", \"idx\": "..idx.." }') &")
end
and JSON.lua with this content. There are two functions in there, which we will use later and JSON decoding/encoding functions ( you might already have that ).
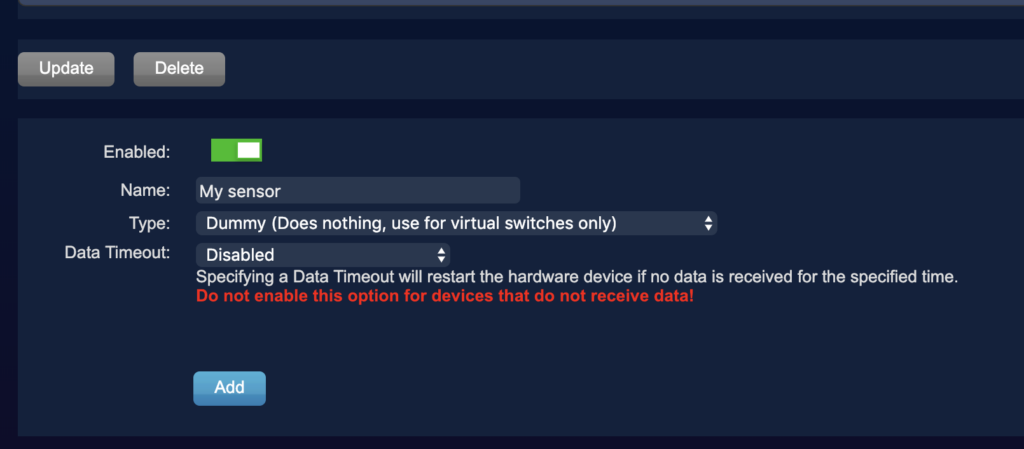
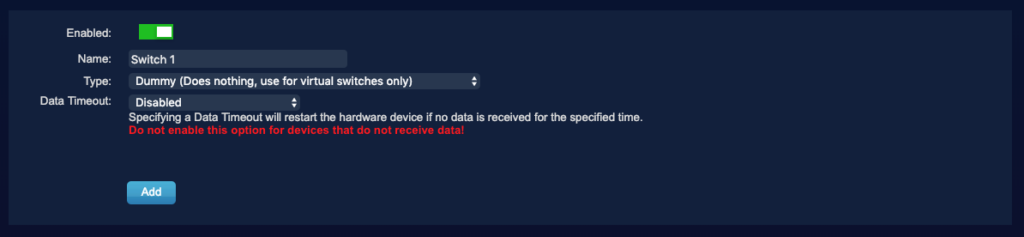
In Domoticz web interface, go to Setup -> Hardware and create a new device that is Dummy (Does nothing, use for virtual switches only). Name it however you like and save it.
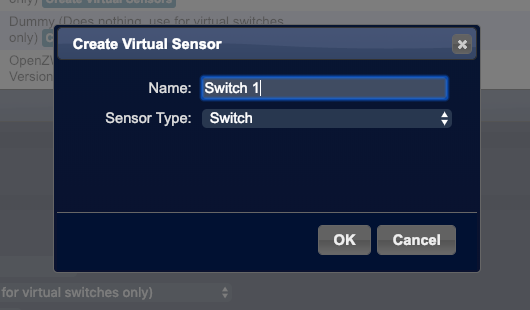
When added to your list, tap on Create virtual sensors , name it, and select Temperature.
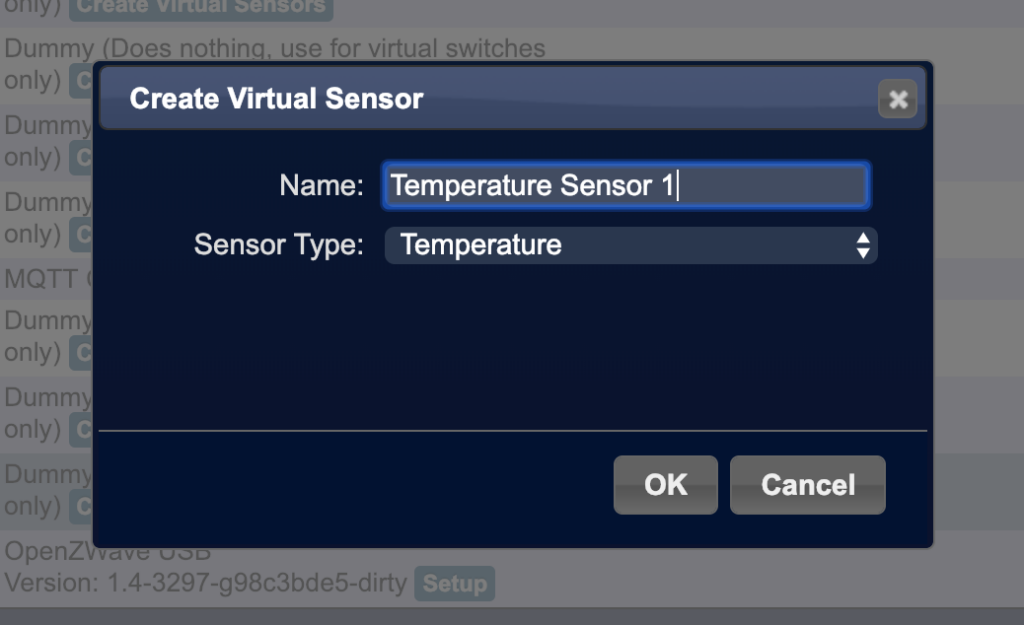
You can repeat the same for Humidity, Pressure, etc.
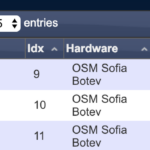
Go to Setup -> Devices. Remember the idx of the sensors added. We will use them in another Lua script.
For convinience, I’m adding the script here. Make sure it’s name starts with script_time_ (e.g. script_time_sensor_1.lua), so that it’s executed every minute.
commandArray = {}

json = (loadfile "/config/scripts/lua/JSON.lua")()

indexArray = 0

-- make sure these match the ids for added virtual sensors
idxTemp1 = 9
idxHumidity1 = 10
idxPressure1 = 11

-- sensor 1
local config=assert(io.popen('curl https://api.opensensemap.org/boxes/5ad4e2fb223bd800193bec4e/sensors' ))
local location = config:read('*all')
config:close()
local jsonLocation = json:decode(location)

loadfile "/config/scripts/lua/FUNCTIONS.lua"()
local d = timestampToTime(jsonLocation.sensors[1].lastMeasurement.createdAt)
local now = timeGMT()

-- if it wasn't updated, skip it.
if (d < now - 119) then
    print("Skipping Sensor 1...")
    return commandArray
end

temp1 = jsonLocation.sensors[1].lastMeasurement.value
pressure1 = jsonLocation.sensors[2].lastMeasurement.value
humidity1 = jsonLocation.sensors[3].lastMeasurement.value

print('Temperature Sensor 1: '..temp1)
print('Pressure Sensor 1: '..pressure1)
print('Humidity Sensor 1: '..humidity1)

commandArray[0] = {['UpdateDevice'] = tostring(idxTemp1)..'|0|'..tostring(temp1)}
commandArray[1] = {['UpdateDevice'] = tostring(idxHumidity1)..'|'..tostring(humidity1)..'|0'}
commandArray[2] = {['UpdateDevice'] = tostring(idxPressure1)..'|0|'..tostring(pressure1)}

-- enable this if you want to update the MQTT server. If not, you can safely skip it.
-- reqUpdate(idxTemp1)
-- reqUpdate(idxHumidity1)
-- reqUpdate(idxPressure1)

return commandArray
Make sure to replace the ID of the sensebox with yours or the one you want to use.
I’m also bit lazy here – I’m not properly parsing it, so if you don’t have humidity or pressure, or your ordering in the
Also, if you want to enable MQTT posting of data, you can configure your server location in FUNCTIONS.lua and enable reqUpdate() rows in the example script above.
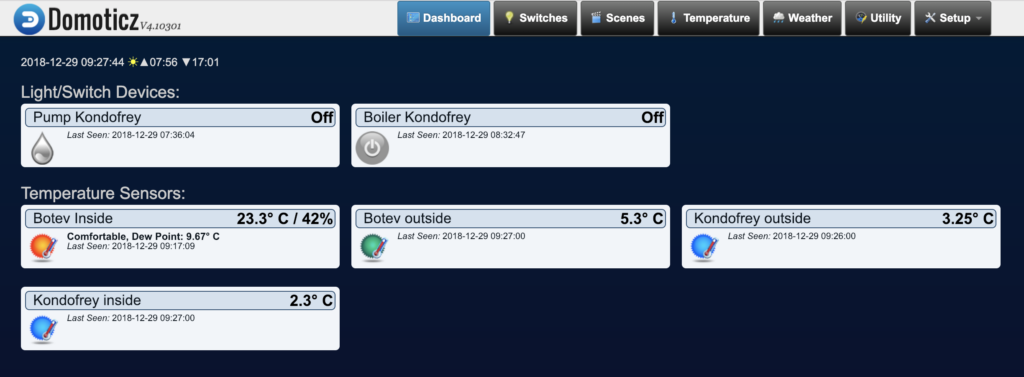
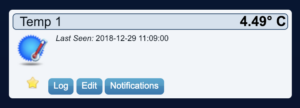
If you completed all steps properly, you will see the added temperature reading in Domoticz – Temperature tab.
ESPurna
Let’s connect a Sonoff switch with ESPurna firmware to Domoticz. That’s very easy to do, once we have MQTT and are running on recent ESPurna firmware.
First, go to Domoticz web -> Setup -> Hardware and add new Dummy device:
Tap on Create Virtual Sensors on the newly created row and add type Switch:
You can further customize the look of the switch by going to Switches tab and clicking on Edit button and customizing it:
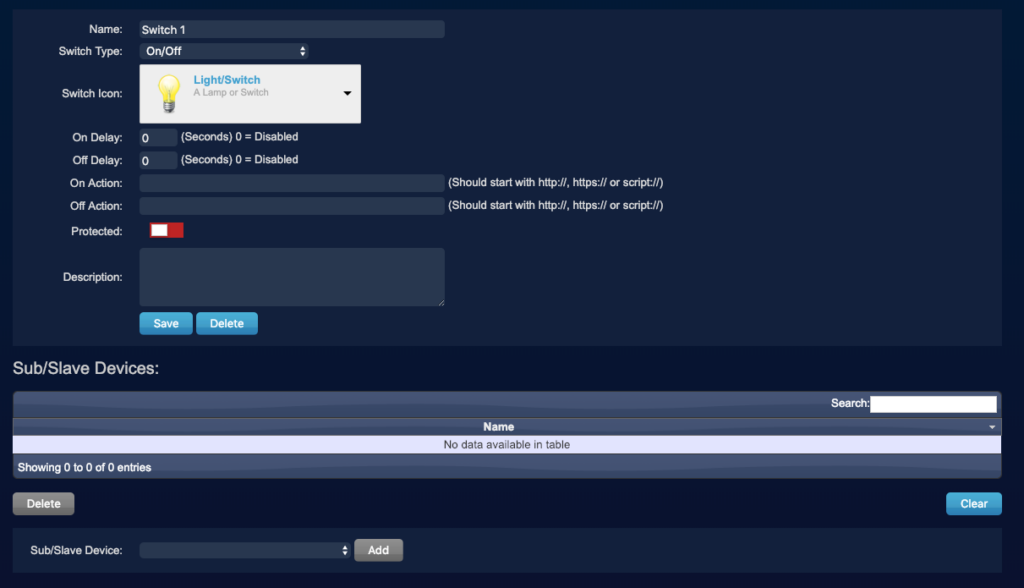
Note the idx #, you will need it later.
In ESPurna’s web interface, configure the MQTT server. Note that if your switch is outside your network, it has to be accessible.
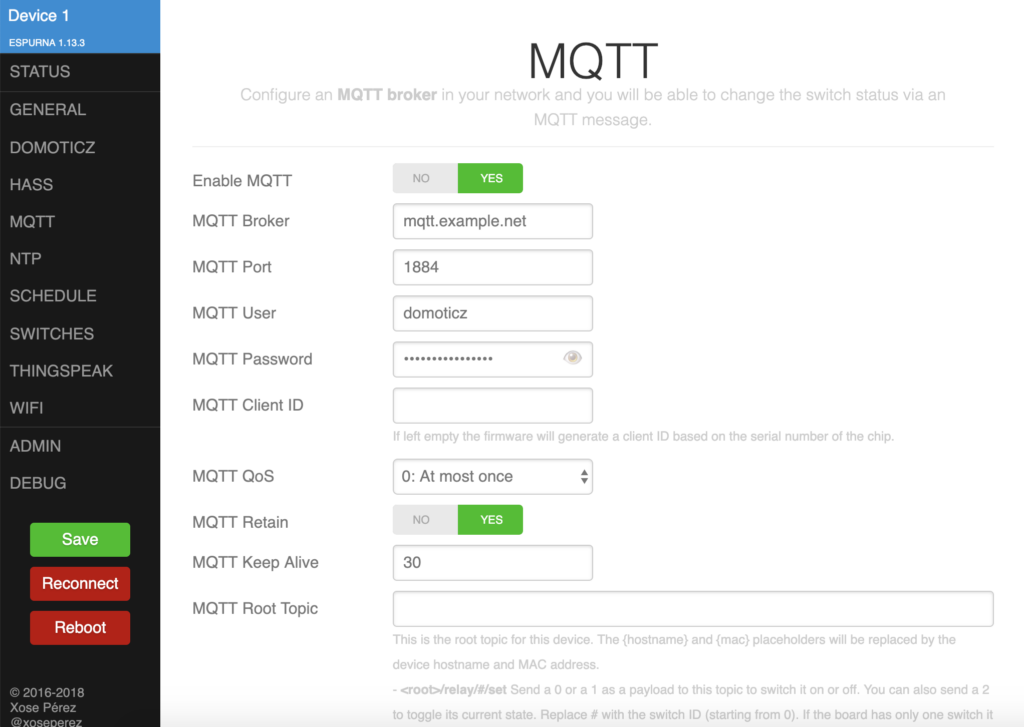
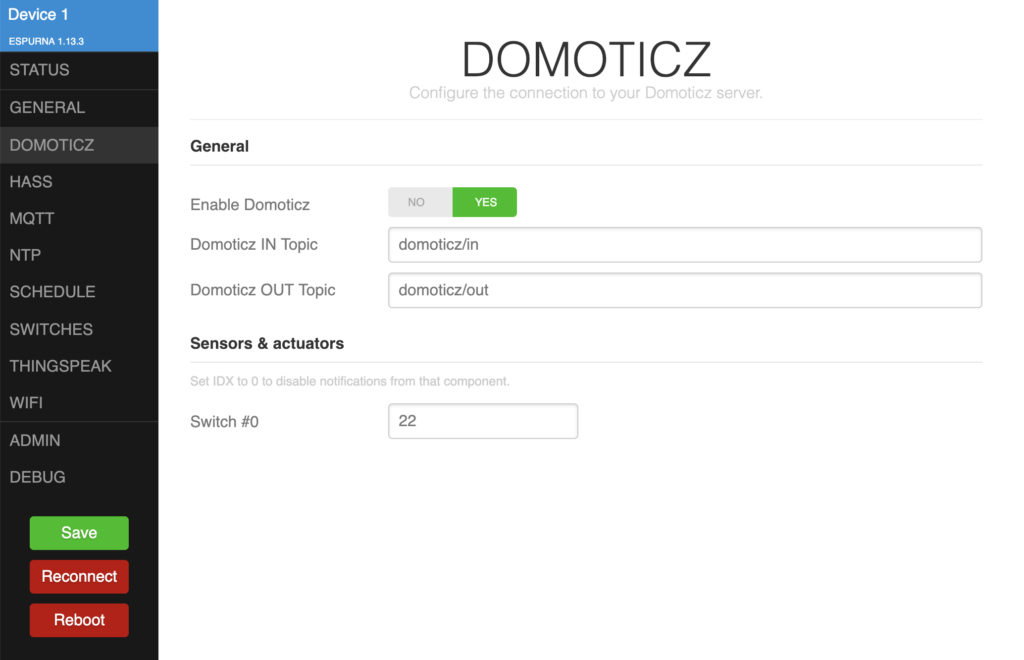
Save it and then go to DOMOTICZ tab. Enable it, the defaults should be okay. Make sure to change the Switch #0 (or whatever entries you have – some devices have more) to the
Save again and go to DEBUG section. Observe the connection to MQTT is successful and if it’s not, you have to double check your configuration.
Z-Wave
While Z-Wave devices are not cheap and you need an USB adapter, they can also be attached if you have any.
Go to Domoticz web -> Setup -> Hardware and add OpenZWave USB device:
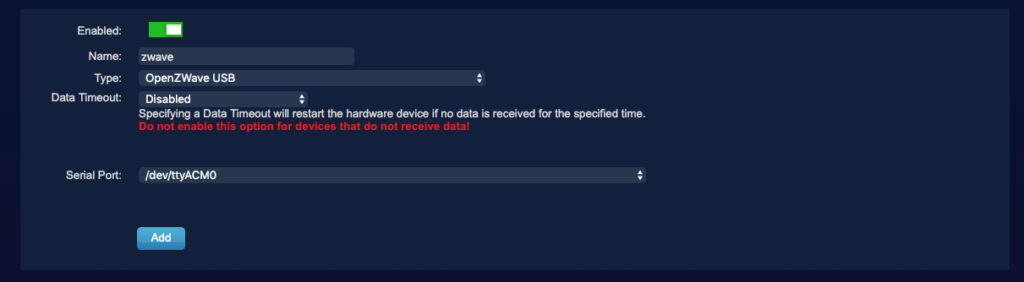
Click on Setup and configure it. Here’s actually
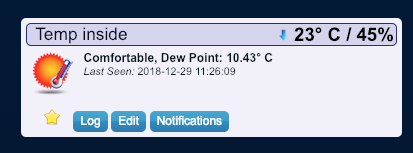
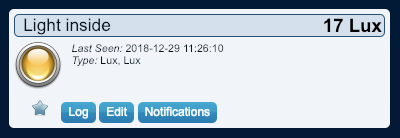
Once You’re done, you should be able to see all your added devices and monitor whatever they provide ( I have an Aeotec ZW100 MultiSensor 6 device and this shows several “switch”-es and readings ). However, I’m not really interested in anything besides the light reading and temperature + humidity:
Domoticz also have apps for both iOS and Android. However, they are pretty ugly (sorry, but that’s true) and I prefer using the web page.
I hope you enjoyed this tutorial. I will be adding more info very soon, related to Domoticz and automation.