I’ve successfully installed proxmox and ran some LXC containers on it on my OPI5.
Basically, you follow this guide.
except with few changes, related to Debian 12.
First, make sure you are on the Debian 12 Bookworm ( I’ve installed the official image from Orange Pi, no idea if the others will work, but they should, in general ).
Configure the hostname after editing /etc/hosts:
# replace with your hostname

hostnamectl hostname pimox

After that, set the static IP with (replace with your values):

nmcli con add type bridge ifname vmbr0

# make sure that you ethernet interface is end1 or replace with the one you have:

nmcli con add type bridge-slave ifname end1 master vmbr0

# replace with your IP/range

nmcli con mod bridge-vmbr0 ipv4.addresses "192.168.1.100/24"

# replace with your gateway

nmcli con mod bridge-vmbr0 ipv4.gateway "192.168.1.1"

# replace if you want different DNSes

nmcli con mod bridge-vmbr0 ipv4.dns "4.2.2.1,8.8.8.8"

# replace with your hostname

nmcli con mod bridge-vmbr0 ipv4.dns-search "pimox"

nmcli con mod bridge-vmbr0 ipv4.method "manual"

# execute this, replacing the mac address with your own. On each node, the mac address should be different, otherwise you cannot have more than one proxmox server
nmcli con mod bridge-vmbr0 ethernet.cloned-mac-address 70:48:f7:1a:2b:3c

# this should NOT be done through ssh or you'll lose connection:

nmcli con down "Wired connection 1"

nmcli con up bridge-vmbr0
Then reboot if needed ( it was needed on my side ).
Continue to setup with the manual, but replace the “Add proxmox ve repository” command with:
echo "deb https://global.mirrors.apqa.cn/proxmox/debian/pve bookworm port">/etc/apt/sources.list.d/pveport.listWhen finished, you don’t need to reboot anymore, just access the interface on the usual 8006 port.
So far , I’ve tested LXC containers. More info here – you need to add repository for arm64 images.
Haven’t tested VMs yet. I will update if there are any changes or fixes I’ve found. There’s some info how to do it here.
You will need to create the bridge manually also via the interface:
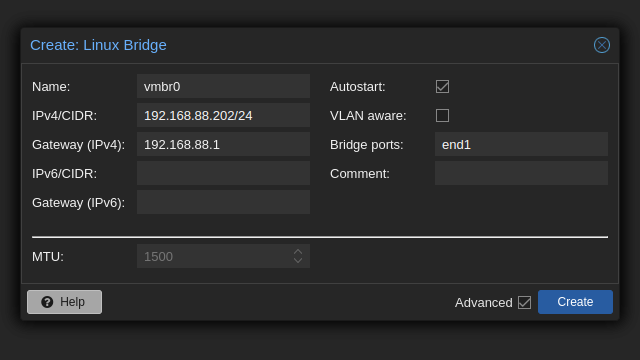
There will be some errors, as we created it with console commands, but just ignore them. After adding, reboot the node. This step is essential for proper creation of cluster and adding nodes.
Another thing I do (because my backups are on NFS drive) is edit /etc/vzdump.conf and set:
tmpdir /vzdumpYou need to also create the folder
Note: if you want to remove the annoying popup when logging in, open /usr/share/javascript/proxmox-widget-toolkit/proxmoxlib.js and around row 549 remove the Ext show block ( be careful not to break js script ).