HC-12 is an interesting device. It operates on 433 MHz and I think will be perfect for a sensor network. You can read very detailed info here, I will not go deep into details.
First, you need to configure it. For that purpose, I use very simple PL2303 USB to RS232 converter. If you use Mac OS X – you can use these drivers. Otherwise, you might not be able to see the device.
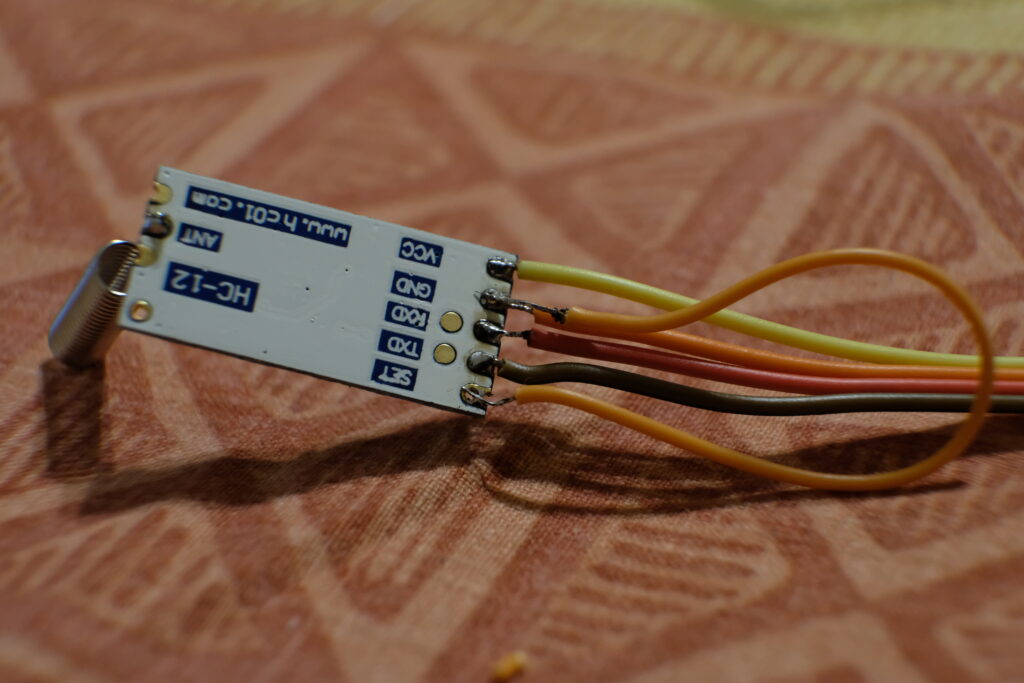
You need to connect HC-12’s four pins. VCC goes to PL2303’s VCC ( you can safely use 3.3 or 5V, HC-12 can work with 3.2 – 5.5V ), GND goes to GND, RX goes to TX, TX goes to RX. That’s how serial comms work.

Don’t forget to connect SET to GND in order to access it.
When you do this, connect to your computer ( I use Macbook Pro ) and find it:
ls /dev/tty.*
/dev/tty.Bluetooth-Incoming-Port /dev/tty.KrasimirsBOSEQC35-SPPDev-1
/dev/tty.KrasimirsBOSEQC35-SPPDev /dev/tty.usbserial
Mine is /dev/tty.usbserial , yours might be different. I connect to it like that:
screen /dev/tty.usbserial 9600
After which you can send commands to it. For detailed commands info, see the top link. Note that you might need to paste it, as it expects the speed to be very fast. For my purposes, I will use channel 7, so I do:
AT+C007
and the reply is:
OK+C007
Which is okay for me. I leave all other settings by default. You can check it with
AT+RX
Which produces:
OK+B9600
OK+RC007
OK+RP:+20dBm
OK+FU3
You can now disconnect SET and your module is ready for connection 🙂 In the next post, I will show you how to connect it to Arduino Mini Pro 8 Mhz ( or similar, it doesn’t matter that much ) and send sensor data ( temperature in my case, but really can be anything ).
I hope you enjoy this as much as I do. If you have questions, let me know.
3 comments On Playing with HC-12 wireless transmitter / receiver
Hi, Thanks for the nice article. One question: If the serial data is transparent, when does the module turn on and off the carrier? I have used serial RF modules in the past that use delimiters in the string, such as STX ($02) and ETX ($03) at the beginning and end of the string you wish to transmit. Or even simpler, by putting a CR and/or LF at the end. How does this module decide where the desired string begins and ends. It can’t leave the carrier on at all time? Thanks, Kerry
Hi Kerry. I think it’s automatic, because I have never used specific delimiters and it works. I tried finding information in the Data sheet, but could not find any. So my guess is that the listener listens all the time and when there’s data, it’s being sent at the specific frequency and then it stops.
Thanks for the response. I haven’t obtained any of these yet, but I often have projects where they will come in handy. When I get one, I guess I’ll monitor the current draw on one trace and the data going to the module on the other. There must be a time-out when it declares there are no more immediate bytes to send. One reason this is important is if you send a string to a device, the receiving device needs to wait until the carrier from the sending device stops so it’s response can be heard. The timeout might be so fast, maybe 2 or 3 serial byte times, that it is never an issue. Thanks again.