General
In this tutorial we will use ESP32 board as a gateway between Bluetooth sensors ( Xiaomi LYWSD03MMC LCD configured here, but should work with anything else, too ) and Home Assistant’s MQTT server ( You can use any other platform instead of Home Assistant, of course).
You can check some of the supported BLE sensors here.
Prerequisites:
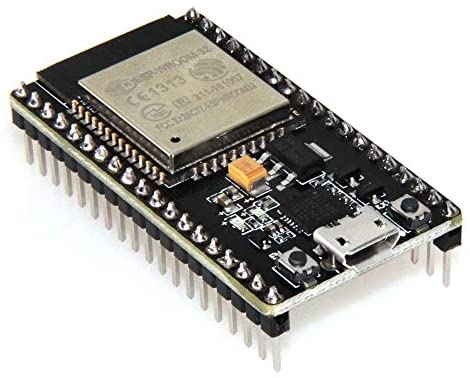
- ESP32 development board ( you can buy any on aliexpress.com ). This is needed in order to directly access BLE sensors.
- Home assistant and MQTT configured.
- Installed esphome console tools ( Linux or Mac OS X preferred, can’t help a lot with Windows, sorry ).
The yaml file (configuration file for esphome)
You need this file to be used as configuration basis for esphome. Tweak as you see fit and make sure your MQTT credentials are correct. Save as esp32-ble.yaml or anything you want.
Note: You might have to replace “nodemcu-32s” with the board you have, check esphome documentation. In general, it should work with almost all ESP32 boards.
esphome:
  name: ble_mqtt
  platform: ESP32
  board: nodemcu-32s

wifi:
  ssid: "my-wifi-2ghz-network"
  password: "my-wifi-password"

  ap:
    ssid: "ble_mqtt hotspot"
    password: "my-ap-password"

captive_portal:

logger:

ota:
  password: "ota-password"

mqtt:
  broker: IP_ADDRESS_OF_BROKER
  port: 1883
  username: USER
  password: PASSWORD
  topic_prefix: ble-sensors

esp32_ble_tracker:
First installation
It must be done via cable, afterwards we can use OTA updates. Connect the ESP32 to the computer and execute
esphome esp32-ble.yaml runIt will start compiliing the file, downloading required packages. When it’s done it will ask you how to install. Select the USB port where it’s connected. If you don’t see it, check your connection.
When esphome tries to access the port, press the boot ( or flash ) button on the ESP32 board, wait a second or two and depress it.
Now it should start writing. If it still doesn’t, please check how to properly enter flash mode on your ESP32 variant.
When it’s done, you should see a lot of logs, similar to this:
INFO Waiting for result...
INFO OTA successful
INFO Successfully uploaded program.
INFO Starting log output from ble-sensors/debug
INFO Connected to MQTT broker!
[15:12:57][I][ota:269]: OTA update finished!
[15:13:02][I][mqtt:202]: MQTT Connected!
[15:13:02][I][app:059]: setup() finished successfully!
[15:13:02][I][app:105]: ESPHome version 1.15.2 compiled on Oct 25 2020, 15:09:54
[15:13:02][C][wifi:443]: WiFi:
[15:13:02][C][wifi:303]:   SSID: 'my-wifi-2ghz-network'
[15:13:02][C][wifi:304]:   IP Address: 192.168.88.51
[15:13:02][C][wifi:306]:   BSSID: 64:D1:54:A7:7C:43
[15:13:02][C][wifi:307]:   Hostname: 'ble_mqtt'
[15:13:02][C][wifi:311]:   Signal strength: -61 dB ▂▄▆█
[15:13:02][C][wifi:315]:   Channel: 6
[15:13:02][C][wifi:316]:   Subnet: 255.255.255.0
[15:13:02][C][wifi:317]:   Gateway: 192.168.88.1
[15:13:02][C][wifi:318]:   DNS1: 192.168.88.1
[15:13:02][C][wifi:319]:   DNS2: 192.168.1.1
[15:13:02][C][logger:185]: Logger:
[15:13:02][C][logger:186]:   Level: DEBUG
[15:13:02][C][logger:187]:   Log Baud Rate: 115200
[15:13:02][C][logger:188]:   Hardware UART: UART0
[15:13:02][C][esp32_ble_tracker:530]: BLE Tracker:
[15:13:02][C][esp32_ble_tracker:531]:   Scan Duration: 300 s
[15:13:02][C][esp32_ble_tracker:532]:   Scan Interval: 320.0 ms
[15:13:02][C][esp32_ble_tracker:533]:   Scan Window: 30.0 ms
[15:13:02][C][esp32_ble_tracker:534]:   Scan Type: ACTIVE
[15:13:08][D][esp32_ble_tracker:544]: Found device 18:BE:D0:6A:85:55 RSSI=-91
[15:13:08][D][esp32_ble_tracker:565]:   Address Type: RANDOM
[15:13:40][D][esp32_ble_tracker:544]: Found device A4:C1:38:F6:CA:AF RSSI=-66
[15:13:40][D][esp32_ble_tracker:565]:   Address Type: PUBLIC
[15:13:40][D][esp32_ble_tracker:567]:   Name: 'LYWSD03MMC'
[15:14:12][D][esp32_ble_tracker:544]: Found device A4:C1:38:86:F3:2F RSSI=-72
[15:14:12][D][esp32_ble_tracker:565]:   Address Type: PUBLIC
[15:14:12][D][esp32_ble_tracker:567]:   Name: 'LYWSD03MMC'
Note the Found device lines. In my case it discovered several 3 BLE devices, two of which are my Xiaomi thermometers.
Write down the MAC addresses of all devices you want to add ( mine are A4:C1:38:F6:CA:AF and A4:C1:38:86:F3:2F )
Add the following to the yaml file:
sensor:
 - platform: xiaomi_lywsd03mmc
   id: "ble_01"
   mac_address: "A4:C1:38:86:F3:2F"
   temperature:
      name: "ble_01_temp"
   humidity:
      name: "ble_01_humidity"
   battery_level:
      name: "ble_01_battery"
Name them as you wish and set your mac addresses from before. If you have different types of BLE sensors, please check esphome documentation on the platform and how to properly add it.
For some devices, this is not enough, sadly. For my case, I have to add additional parameter, bindkey , which is used for payload decryption, so that we can find out the values ( obviously it’s encrypted ).
The easiest way is to use a phone ( I use Android, can’t really tell if ti works with iPhone ) and navigate to https://atc1441.github.io/TelinkFlasher.html ( also tested and works on Mac OS X ).
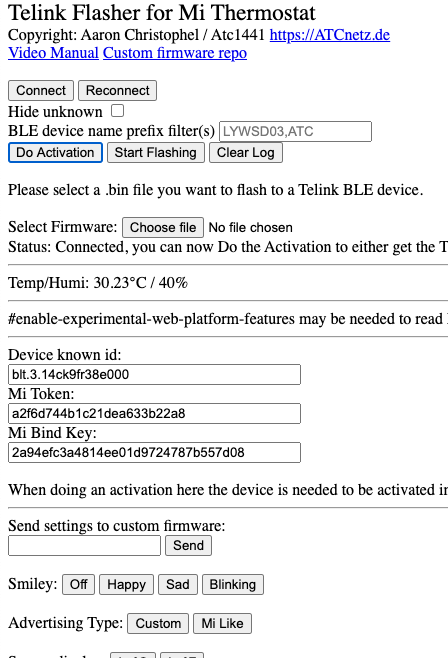
Click on Connect button, a popup should appear with all bluetooth devices.
Select the sensor that you want to find it’s bindkey.
Tap Do activation button afterwards, wait 1-3 seconds and copy the Mi Bind Key field, when it’s prefilled.
In the yaml file, change it to look like ( replacing BINDKEYHERE with the actual bind key from above ):
sensor:
 - platform: xiaomi_lywsd03mmc
   id: "ble_01"
   mac_address: "A4:C1:38:86:F3:2F"
   bindkey: "BINDKEYHERE"
   temperature:
      name: "ble_01_temp"
   humidity:
      name: "ble_01_humidity"
   battery_level:
      name: "ble_01_battery"
When you are done making changes, save the file and run again
esphome esp32-ble.yaml run Now you don’t need to be connected anymore via cable. If you are powering it from USB charger, for example, then esphome will discover it and upload via OTA.
You should now see something like this in the logs
[15:13:02][C][xiaomi_lywsd03mmc:012]: Xiaomi LYWSD03MMC
[15:13:02][C][xiaomi_lywsd03mmc:013]:   Bindkey: 2A.53.55.E8.3F.98.B8.0D.D2.6F.CA.DB.86.19.F6.07 (16)
[15:13:02][C][xiaomi_lywsd03mmc:014]:   Temperature 'ble_01_temp'
[15:13:02][C][xiaomi_lywsd03mmc:014]:     Unit of Measurement: '°C'
[15:13:02][C][xiaomi_lywsd03mmc:014]:     Accuracy Decimals: 1
[15:13:02][C][xiaomi_lywsd03mmc:014]:     Icon: 'mdi:thermometer'
[15:13:02][C][xiaomi_lywsd03mmc:015]:   Humidity 'ble_01_humidity'
[15:13:02][C][xiaomi_lywsd03mmc:015]:     Unit of Measurement: '%'
[15:13:02][C][xiaomi_lywsd03mmc:015]:     Accuracy Decimals: 0
[15:13:02][C][xiaomi_lywsd03mmc:015]:     Icon: 'mdi:water-percent'
[15:13:02][C][xiaomi_lywsd03mmc:016]:   Battery Level 'ble_01_battery'
[15:13:02][C][xiaomi_lywsd03mmc:016]:     Unit of Measurement: '%'
[15:13:02][C][xiaomi_lywsd03mmc:016]:     Accuracy Decimals: 0
[15:13:02][C][xiaomi_lywsd03mmc:016]:     Icon: 'mdi:battery'
You soon should start getting some readings in the mqtt topics ( you can check with external application, I use MQTT Explorer for this ).
Home Assistant configuration
In order for Home assistant to find the new sensors, they need to be configured manually.
Open configuration.yaml of HASS and add the following to your sensor: section. If it does not exist, create it:
sensor:Add your configuration, replacing my example ids and names with yours:
# xiaomi temperature 1
  - platform: mqtt
    name: "ble_01_temp"
    state_topic: "ble-sensors/sensor/ble_01_temp/state"
    unit_of_measurement: '°C'
    value_template: "{{ value }}"
    availability_topic: "zigbee2mqtt/bridge/state"
    device_class: "temperature"

  - platform: mqtt
    name: "ble_01_humidity"
    state_topic: "ble-sensors/sensor/ble_01_humidity/state"
    unit_of_measurement: '%'
    value_template: "{{ value }}"
    availability_topic: "zigbee2mqtt/bridge/state"
    device_class: "humidity"

  - platform: mqtt
    name: "ble_01_battery"
    state_topic: "ble-sensors/sensor/ble_01_battery/state"
    unit_of_measurement: '%'
    value_template: "{{ value }}"
    availability_topic: "zigbee2mqtt/bridge/state"
    device_class: "battery"
Save the file, check it via Configuration -> Server controls -> Check configuration and if it’s valid, restart it from the same page.
Now you should be able to add the sensor to your Home Assistant ( there will be another customization post very soon ).
Adding more sensors
You should save your yaml file for updating the BLE gateway somewhere safe, otherwise you will need to run all the steps again.
When you want to add a new BLE sensor, first execute:
esphome esp32-ble.yaml logsin order to find the sensor’s MAC address in the logs on the screen.
After you’ve found the MAC address, add the configuration in your sensor: section, similar to above. When done, execute:
esphome esp32-ble.yaml runIn order to compile and upload the new configuration. If everything was correct, you soon should start receiving updates from the new sensor.
2 comments On Bluetooth Low Energy ( BLE ) sensors into Home Assistant (or any other platform, actually)
Nice job
Thank you
Super instructions! Thank u!